

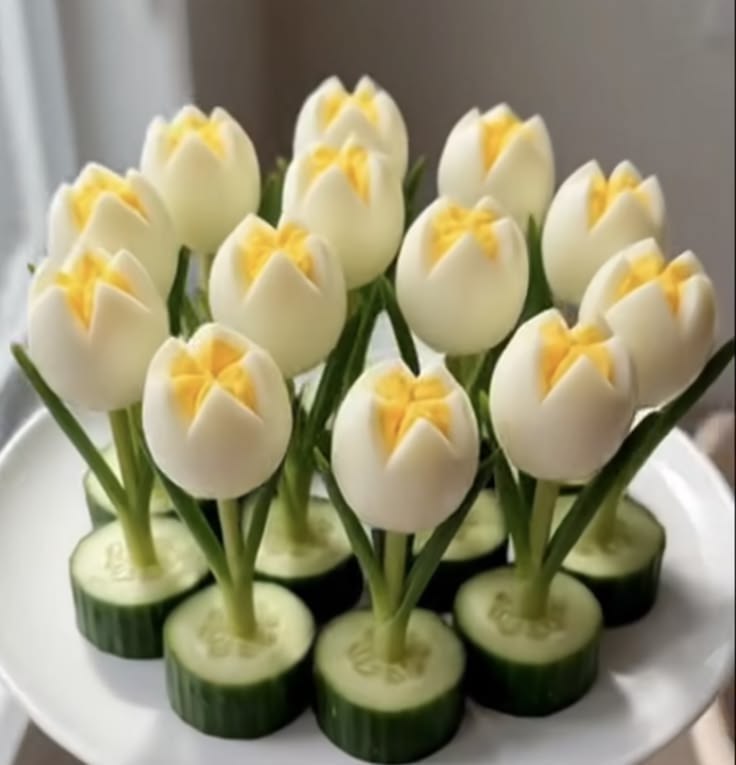


When hosting a holiday meal, spring brunch, or special gathering, a showstopping centerpiece that doubles as a delicious appetizer is a win-win. These Deviled Egg Tulips take classic deviled eggs to a whole new level of presentation, transforming simple hard-boiled eggs into a bouquet of edible spring flowers.
Anchored firmly in crisp cucumber rounds with fresh green onion stems, these tulip eggs are as fun to make as they are beautiful to display.
Below, we share a complete ingredient list, step-by-step carving and filling instructions, and pro-tips for flawless assembly.
Ingredients You’ll Need
For the Egg Tulips:
-
12 large eggs (hard-boiled and peeled)
-
1 bunch fresh green onions / scallions (stiff stems, trimmed)
-
1 large English cucumber (sliced into 1-inch thick rounds for the bases)
For the Creamy Filling:
-
1/2 cup mayonnaise
-
1 tbsp Dijon or yellow mustard
-
1 tsp white vinegar or lemon juice
-
1/2 tsp garlic powder
-
Salt and freshly cracked black pepper to taste
-
Pinch of paprika (optional)
Step-by-Step Assembly Instructions
Step 1: Slice the Tulip Petals
Using a small, sharp paring knife, make a small crisscross “X” incision on the pointed top end of each peeled hard-boiled egg, cutting about 1/3 of the way down. Gently ease the top open to expose the yolk without splitting the egg completely.
Step 2: Remove Yolks & Make Filling
Gently scoop or squeeze the cooked egg yolks out through the top opening into a mixing bowl. Mash the yolks with a fork until smooth, then stir in mayonnaise, mustard, vinegar, garlic powder, salt, and pepper until velvety smooth.
Step 3: Fill the Tulips
Spoon the filling mixture into a piping bag (or a ziplock bag with a corner snipped off). Pipe the yolk filling back into the center of each carved egg tulip until it slightly overflows the top cutouts like flower centers.
Step 4: Assemble the Bases & Stems
Slice an English cucumber into thick 1-inch rounds. Use a toothpick or small skewer to poke a hole in the center of each cucumber round. Insert a sturdy green onion stem into each cucumber base, then carefully press an egg tulip onto the top end of the stem.
Step 5: Arrange and Serve
Arrange the standing egg tulips closely together on a serving platter to form a full bouquet, and keep chilled until ready to serve!
3 Pro-Tips for Perfect Deviled Egg Tulips
-
Use Older Eggs for Easy Peeling: Eggs that are a week or two old peel much smoother than fresh eggs, giving you clean, flawless white “petals.”
-
Choose Stiff Green Onion Stems: Select green onions with firm, thick stems so they comfortably support the weight of the stuffed egg.
-
Anchor with Skewers if Needed: If your green onion stems feel a bit soft, insert a wooden toothpick or small bamboo skewer through the stem into the cucumber base for extra stability.
Conclusion
With simple pantry ingredients and a little patience, these Stuffed Deviled Egg Tulips turn an everyday favorite into an unforgettable culinary centerpiece that’s guaranteed to delight your guests!
Frequently Asked Questions (FAQ)
Can I make egg tulips ahead of time?
Yes! You can hard-boil, carve, and pipe the eggs up to 24 hours in advance. Store the stuffed eggs in a single layer in an airtight container in the fridge, then assemble them onto the stems right before serving.
What else can I use for the base?
If you don’t have cucumber rounds, firm radishes cut flat on the bottom or small wooden display stands work brilliantly as bases!